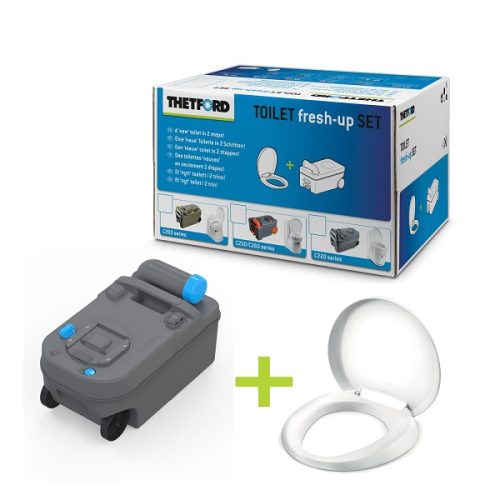
same day shipping

We aim to be the best!

Competitive Pricing

30-day return policy

Easy Returns

  • Lippert Inverted Style Slide Out Rack Repair Kit.This kit does the front of the slide out, as long as you have a Slide Out on the driver's side.Bearing Block repair parts included.Lippert number: 366159SEE SECOND GALLERY PICTURE FOR THE DIFFERENCE BETWEEN STANDARD AND INVERTED.Lippert created the Inverted System to assist with water draining and not building up inside the rails.
  • Lippert Inverted Style Slide Out Rack Repair Kit.This kit does the rear of the slide out, as long as you have a Slide Out on the driver's side.Bearing Block repair parts included.Lippert number: 366158SEE SECOND GALLERY PICTURE FOR THE DIFFERENCE BETWEEN STANDARD AND INVERTED.Lippert created the Inverted System to assist with water draining and not building up inside the rails.
  • Keep your RV's inverted slide-out system functioning flawlessly with the Lippert Inverted Repair Kit. This kit is meticulously designed to include everything you need for a comprehensive repair, from wheels and shoes to foam seals and fitting parts. It's the perfect choice for DIY enthusiasts and professionals alike, offering a straightforward installation process for LCI in-wall slide-outs. Trust Lippert and RV Spares to deliver the highest quality repair solutions, ensuring your RV's longevity and reliability on the road.
    • Lippert number: 366120
  • Lippert Standard Style Slide Out Rack Repair Kit.This kit does the front of the slide out, as long as you have a Slide Out on the driver's side.2 x Rails and Bearing Block repair parts included.Lippert number: 366156SEE SECOND GALLERY PICTURE FOR THE DIFFERENCE BETWEEN STANDARD AND INVERTED.
  • Lippert Standard Style Slide Out Rack Repair Kit.This kit does the rear of the slide out, as long as you have a Slide Out on the driver's side.2 x Rails and Bearing Block repair parts included.Lippert part number: 366154SEE SECOND GALLERY PICTURE FOR THE DIFFERENCE BETWEEN STANDARD AND INVERTED.
  • The Lippert Slide Out Standard Repair Kit is your all-in-one solution for maintaining the optimal performance of your RV's slide-out system. Packed with essential components like wheels, shoes, foam seals, and fitting parts, this kit simplifies the repair process, ensuring your RV remains in peak condition. Designed specifically for LCI in-wall slide-outs, it offers a hassle-free installation, saving you time and effort. Rely on Lippert and RV Spares for high-quality repair kits that keep your adventures smooth and uninterrupted.
    • Lippert number: 366121
  • Enhance your RV's slide-out functionality with the Lippert Slide Out Standard Bearing Block Shoe Set. This comprehensive set includes four bearing block shoes, designed for effortless installation within the sidewall of your RV. Lippert's dedication to quality and ease of use makes this set an essential upgrade for any RV owner looking to ensure smooth and reliable slide-out operation. Trust in Lippert and RV Spares for all your slide-out system needs, and enjoy a worry-free RV experience with parts that fit perfectly and perform exceptionally
    • Lippert number: 238463
    SEE SECOND PICTURE FOR DIFFERENCE BETWEEN STANDARD AND INVERTED RACKS.
  • Dicor Roof Renew Kit

    $ 1,099.00 each incl. GST
    Rejuvenate your RV's aesthetic and ensure it remains in prime condition with the Dicor Roof Renew Kit, expertly engineered for 30 ft. RV units. Our comprehensive package delivers everything required for a full restoration, with clear instructions for easy application.Kit Components Overview:Cleaner/Activator: Unlock the potential of your RV's EPDM roof with our Cleaner/Activator. Its specialized formula transforms the roofing surface, creating an optimal bonding site for the Acrylic Coating. Acrylic Coating: Experience the strength of our high solids acrylic elastomer blend, designed to adapt to your roof's substrate and conditions. Coating Ready Cover Tape: Fortify your RV's roof by seamlessly sealing cracks or tears with our durable, fleece-backed sealing tape. Inclusions:Four gallons of Dicor EPDM Roof Acrylic Coating Two quarts of Cleaner/Activator One 4”x50’ roll of Coating-Ready Cover Tape Metal pan, 9” paint roller, two roller covers Masking tape and detailed instructionsSURFACE INSPECTION AND PREPARATION
    1. Remove heavy deposits of dirt, leaves, pine needles and other debris using a broom or air blower. Any rocks or other large objects should also be removed.
    2. Roof must be in good condition. Do not apply on pryable or brittle roofing. EPDM surface must be free of standing water, ice, snow, oils or grease at time of application.
    3. Inspect roof carefully for cracks in the surface. These will need to be repaired later (see Coating Ready Cover Tape).
    4. EPDM Cleaner/Activator is designed for use on rubber roofing surface only and may damage other exterior parts of RV. It is highly recommended that you secure plastic sheeting over entire sidewalls as well as front and rear end caps to protect them from possible damage. If EPDM Cleaner/Activator contacts any surface other than roof, it should be rinsed immediately.
    Dicor Cleaner/Activator Application
    1. DANGER: May cause severe irritation of the eyes and skin, gastrointestinal irritation, nausea, vomiting and diarrhea. May burn muost skin. Prolonged or repeated breathing of vapor or spray mist may be harmful. Use a respirator for protection from vapor or spray mist. Wear chemical resistant gloves, splash proof goggles and rubber overshoes. Avoid eye and skin contact. Do not take internally. Wash thoroughly after handling and before eating or smoking. Keep container closed when not in use.
    2. EPDM Cleaner/Activator is a ready-to-use material. It can be applied using a Hudson-type agricultural sprayer. Safety glasses with side shields and latex gloves are recommended when transferring EPDM Cleaner/Activator from the shipping container to the sprayer. Spray a fine mist that leaves roof damp. Adjust spray for weather conditions if necessary. If EPDM Cleaner / Activator is running off roof, you have used too much. If using a Hudson sprayer, adjust the spray nozzle to achieve a uniform spray pattern with a 3 to 4 foot arc. Application rate is 125 sq. ft. per quart over new or existing surfaces. Do not apply below 40 degrees F (4 degrees C).
    3. Allow EPDM Cleaner/ Activator to stand a minimum of 15 minutes to wet out and react with the EPDM surface. For best results, rinse with clean water using a minimum 2,000 psi pressure washer. Begin the power rinse at the lowest point on the roof and work upwards, keeping the pressure washer tip within 12” of the EPDM surface. Once the highest point on the roof is reached, work down again with a final rinse to remove any excess dirt or debris from the roof. After cleaning, the roof should be “white” in color, which is an indication that the surface has been chemically altered. Allow surfaces to dry thoroughly prior to application of two coats of the Dicor Acrylic Coating
    4. Clean equipment with water and biodegradable detergent. Purge the water from the pump and hoses using Mineral Spirits prior to storing for any length of time.
    Coating Ready Cover Tape
    1. Roof must be cleaned with Cleaner/Activator prior to application of Coating Ready Cover Tape.
    2. Any areas that are torn or cracked may now be repaired using the Coating Ready Cover Tape.
    3. Peel off a few inches of the release liner and carefully position the Coating Ready Cover Tape before applying. Any attempt to reposition the tape after application will damage the material.
    4. Apply pressure starting at the center of the tape and working towards the outside edges, removing any bubbles as you go. When finished, the edges should have no tunnels, openings or fishmouths.
    5. Only apply Coating Ready Cover Tape to areas that are to be coated the same day.
    Dicor Sure-Seal White Acrylic Roof Coating
    1. Using the masking tape provided, mask off roof edging to enable coating to be applied with a clean, straight edge. Also, mask other surfaces where you do not want coating to be applied.
    2. Dicor White Acrylic Coating must be preceded with Dicor EPDM Cleaner/Activator to ensure proper adhesion (See Cleaner/Activator application). Cleaner/Activator must be removed by power washing prior to application of Acrylic Coating.
    3. All surfaces must be clean and free of residue or loose particles, degraded substrate, grease, oil, dirt, or other contaminates. Surfaces shall be completely dry and frost-free before coating.
    4. Dicor Acrylic Coating shall be applied in a minimum of a 2 coats at a rate of 1 gallon per 125 sq. ft. per coat (i.e., 8’X30’ roof takes 4 gallons). Actual gallons required will depend on the type of surface and texture, method of application, and weather conditions at the time of application. All surfaces must be uniformly coated and free from voids, pinholes, or blisters.
    5. Thoroughly mix the contents for a minimum of 5 minutes prior to application. Dicor Acrylic Coating may be applied by roller (provided) or brush. Dicor Acrylic Coating shall be applied in a minimum of 2 coats at a rate of 1 gallon per 125 sq. ft. per coat (i.e., 8’X30’ roof takes 4 gallons).
    6. Allow to dry for 12 to 24 hours depending on weather conditions.
Go to Top